Wednesday, April 7, 2010

Photoshop Process Post


This is the overdue follow-up to my previous process post. This is a very simple walkthrough of how I typically color images in Photoshop. Specifically, I'll be going over this guy:


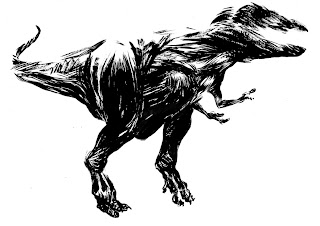
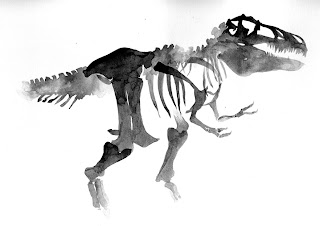
I started out with three separate drawings, a line art drawing, a "shadow/texture" drawing, and a skeletal drawing.
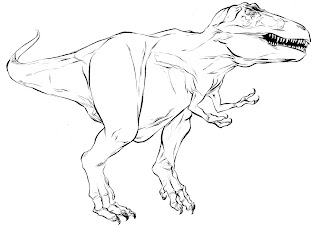


The line drawing came first, followed by the other two that were made with the help of a lightbox. It's important to get everything lined up pretty well at this step. This is like a real world version of the layering process that one would deal with in Photoshop.

I scan all three drawings as 8-bit grayscales at 300 dpi. By scanning at grayscale, I'm saving myself from the headache of dealing with HUGE files and tedious color management issues. I would opt for 600dpi, but my limited hard drive is forcing me to skimp a little. The line art and texture drawings seen above are after I adjusted the levels.

I only made minor adjustments to the skeleton drawing, as I wanted to retain the texture of the paper. That's why you see some fuzz at the top of it. A lot of people (understandably) go for stark black and white contrast, as it makes coloring MUCH easier, but I've become a fan of the residual grit from scanning.


The above image is what those layers look like composited in Photoshop. I left the line drawing as a locked "background" layer, and dragged the other two drawings over it as multiply layers, which I employ a good deal in my digital work. Right now both multiply layers are at reduced opacities to illustrate how the layers line up.

After I'm satisfied with this part of picture, I change the mode of the picture to RGB, since it's still in grayscale. I also hide the texture and skeleton layers for now.


I used the lasso tool and paint bucket to fill in the line art layer with a base color on a separate layer. This is a multiply layer as well. As you can probably tell, I've also applied a radial gradient (USE GRADIENTS SPARINGLY!) with the base color which will help with the visibility of certain details down the road.


I then lowered the opacity of the base color layer, and began adding secondary colors on a separate multiply layer to create more contrast and to fill in areas that I missed with first round of coloring. After this step, I hid the secondary color layer and increased the opacity of the base color layer. I also bring back the skeleton drawing.


As mentioned before, I retained the texture of this drawing because it's gonna work in my favor with this next step. With the skeleton layer selected, I adjusted the color balance to make it more analogous with the base color.


I brought back the other layers, adjusting the opacity for each as necessary. The eye of the T-Rex was being obscured by the skeleton and texture layers, so I took the soft edge eraser tool at a low opacity to both layers around that area. The texture layer was also converted from a multiply layer to a soft light layer. This way, the same implied surface could be retained without overpowering the image.


Finally, for good measure, I colored the lines by adding a screen layer over the line art layer. I used a sampled color from the drawing and used the brush tool to go over the areas that I wanted to adjust.

THE END! (for now...)

Monday, April 5, 2010

Zombie Luv

This was inspired by the call girl ads in the Memphis Flyer that are embarrassingly close to one my favorite sections of that paper.

Sunday, April 4, 2010

MILIEU Opening

Following up on this post, these are pictures from the opening of "Milieu" this past Friday. The ten artists-strong show brought in an huge crowd which was, considering there were so many other events, a huge testament to the supportive community of artists in Memphis. I'll avoid getting too mushy...


Momentum Exhibition

A couple of weeks ago, I was invited to submit work into a show that was being coordinated by CODA, an arts organization from Rhodes College. It was unexpected and definitely an eleventh hour call. The invitation came two days prior to the opening, and I was at a lack of stuff that was ready for exhibition. It was suggested that I perform a live drawing during the show, which was fine but that meant coming up with a idea and making it fit in an undefined space.

Yeah...

I quickly made some sketches out, confirmed how much wall space I had, and prepared for two intense hours of speed drawing. Here are the photos.


If you were interested in seeing this process in motion, my friend Elisha recorded this nifty video of the drawing as it progressed throughout the evening.


More gallery updates to come :)

Monday, March 29, 2010

A Modest Promotion of My Goods


I've got a Etsy store set up, so you should take a little time to consider this:
For ten dollars, you can own a little piece of awesome, and I in return will eat well, thus ensuring my survival and ability to make more pieces of awesome! Just saying...

Wednesday, March 24, 2010

MILIEU Exhibition

This is the design for the event poster for "Milieu", a collaborative installation exhibition at Marshall Arts hosted by the Rozelle Artists Guild. I did the illustration and the title text, and digital maestro Lauren Rae Holtermann made it all super-slick. 

The opening reception will be on April 2nd from 6-9pm at 639 Marshall Avenue. If you're in the area and you're looking for something to help you recover from the April Fools shenanigans, you should come down. There will be live murals, furniture masquerading as people, xeroxes galore, a tribute to that old t-shirt that you wore all the time in middle school, and more!

Monday, March 22, 2010

It Came from the Reviews section!


The Memphis Flyer is kind of a mainstay at the front table at the Art Center, and when faced with a lot of free time and the impulse to draw, I tend to take my inspiration where I can get it.

Wednesday, March 10, 2010

After Some Suggestions...


I think I'm going to leave this one alone for a bit...

Thursday, March 4, 2010

A Drawing Revisited

I decided to give this guy the (limited) color treatment. Thoughts?

Thursday, February 25, 2010

AutoZone and ArtsMemphis...


...are two entities that have interesting capitalization. They are also center stage in this fun little drawing I made this morning. I feel like I have to emphasize MORNING because I woke up at 6:30, which is something I haven't done since I worked for a moving company. By the time I got to the AutoZone HQ downtown, the chill of February had worked its magic better than any expresso shot could have. When I checked in, I was listed as a "performer" working with ArtsMemphis which, after good half-hour, felt like a bit of a misnomer. Granted, I was technically performing, furiously doodling away at my easel- however, context makes a big difference. In the sleek downtown entrance lobby, I exuded the kind of electricity that one enjoys from watching a badminton match on ESPN5. That said, it was still fun to draw and I thank ArtsMemphis for the gig and AutoZone for letting me slap ink around in their front door.

Surprise!

This was a birthday gift to my sweeter-than-all-get-out girlfriend. I surprised her with it a few days ago and she loved it (Thank goodness!). It was quite the task to get it printed, most of it involving multiple bike trips to find a place that makes decent color prints. Surprisingly, the local Kinkos gave me pretty good results, considering they gave me free reign to adjust the print settings on their computer.

Sunday, February 7, 2010

When Hypertrichosis Becomes a Theme...

These were long overdue for posting. I finished the first one when I had some free time at work, and it was suggested that I make some more. The next thing you know there's an odd looking family of four.