This is the overdue follow-up to my
previous process post. This is a very simple walkthrough of how I typically color images in Photoshop. Specifically, I'll be going over this guy:
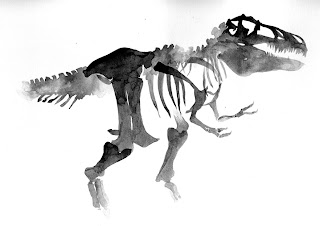
I started out with three separate drawings, a line art drawing, a "shadow/texture" drawing, and a skeletal drawing.
.jpg)
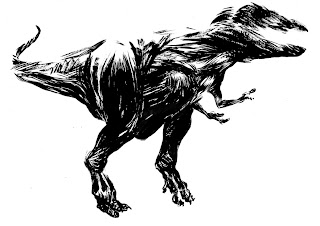
The line drawing came first, followed by the other two that were made with the help of a lightbox. It's important to get everything lined up pretty well at this step. This is like a real world version of the layering process that one would deal with in Photoshop.
I scan all three drawings as 8-bit grayscales at 300 dpi. By scanning at grayscale, I'm saving myself from the headache of dealing with HUGE files and tedious color management issues. I would opt for 600dpi, but my limited hard drive is forcing me to skimp a little. The line art and texture drawings seen above are after I adjusted the levels.
I only made minor adjustments to the skeleton drawing, as I wanted to retain the texture of the paper. That's why you see some fuzz at the top of it. A lot of people (understandably) go for stark black and white contrast, as it makes coloring MUCH easier, but I've become a fan of the residual grit from scanning.
The above image is what those layers look like composited in Photoshop. I left the line drawing as a locked "background" layer, and dragged the other two drawings over it as multiply layers, which I employ a good deal in my digital work. Right now both multiply layers are at reduced opacities to illustrate how the layers line up.
After I'm satisfied with this part of picture, I change the mode of the picture to RGB, since it's still in grayscale. I also hide the texture and skeleton layers for now.
I used the lasso tool and paint bucket to fill in the line art layer with a base color on a separate layer. This is a multiply layer as well. As you can probably tell, I've also applied a radial gradient (USE GRADIENTS SPARINGLY!) with the base color which will help with the visibility of certain details down the road.
I then lowered the opacity of the base color layer, and began adding secondary colors on a separate multiply layer to create more contrast and to fill in areas that I missed with first round of coloring. After this step, I hid the secondary color layer and increased the opacity of the base color layer. I also bring back the skeleton drawing.

As mentioned before, I retained the texture of this drawing because it's gonna work in my favor with this next step. With the skeleton layer selected, I adjusted the color balance to make it more analogous with the base color.
I brought back the other layers, adjusting the opacity for each as necessary. The eye of the T-Rex was being obscured by the skeleton and texture layers, so I took the soft edge eraser tool at a low opacity to both layers around that area. The texture layer was also converted from a multiply layer to a soft light layer. This way, the same implied surface could be retained without overpowering the image.
Finally, for good measure, I colored the lines by adding a screen layer over the line art layer. I used a sampled color from the drawing and used the brush tool to go over the areas that I wanted to adjust.
THE END! (for now...)
.jpg)

.jpg)
.jpg)
.jpg)


.jpg)
.jpg)


.jpg)
.jpg)